Monday, October 5, 2009
Linux PXE boot Step by step guide
I wish I could post the screen shots of provisioning/cloning etc using RHN satellite server.
hmm everything is confidential (corporate companies). provisioning using RHN satellite server
is easy and more controllable.
1)Install dhcp and tftp-server
yum install dhcp tftp-server
2)Configure DHCP for PXE boot
Add following entries
#cat /etc/dhcpd.conf
ddns-update-style interim;
allow booting;
allow bootp;
# Standard configuration directives...
subnet 192.168.95.0 netmask 255.255.255.0 {
# option domain-name "nwd.ne.gov";
option subnet-mask 255.255.255.0;
option broadcast-address 192.168.95.255;
option domain-name-servers 10.41.10.105;
# option routers default_router;
next-server 192.168.95.3;
}
# Group the PXE bootable hosts together
group {
# PXE-specific configuration directives...
#next-server 192.168.95.3;
filename "pxelinux.0";
# You need an entry like this for every host
# unless you're using dynamic addresses
host lrhdol1 {
hardware ethernet 00:0C:29:09:AA:E8;
fixed-address 192.168.95.5;
option host-name "lrhdol1";
}
}
3)copy pxelinux.cfg, menu.c32 on to tftpboot directory
#For pxelinux image
cp /usr/lib/syslinux/pxelinux.0 /tftpboot
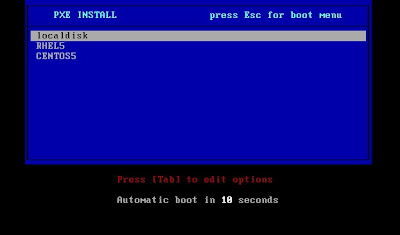
#For menu (Blue screen with lables)
cp /usr/lib/syslinux/menu.c32 /tftpboot
if you want to use other /tftpboot dir, change in /etc/xinetd.d/tftp file
grep server /etc/xinetd.d/tftp
# description: The tftp server serves files using the trivial file transfer \
server = /usr/sbin/in.tftpd
server_args = -s /tftpboot
and
Edit the file /etc/xinetd.d/tftp and change the line that says “disable = yes” to “disable = no “.
3) create pxelinux.cfg directory for menu options
cd /tftpboot
mkdir pxelinux.cfg
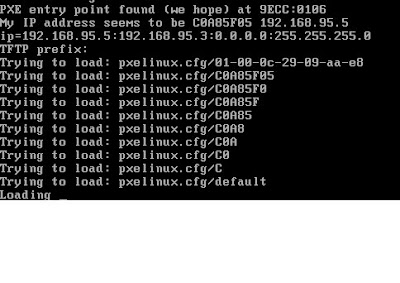
touch 000C2909AAE8
touch C0A85F05
touch C0A85F0
touch C0A85F
....
..
touch C
touch default
4) create Menu file
This I have created for CENT OS and RHEL 5
#cat default
PROMPT 0
TIMEOUT 100
MENU TITLE PXE INSTALL press Esc for boot menu
F1 msgdir/boot.msg
F2 msgdir/options.msg
LABEL localdisk
localboot 1
LABEL RHEL5
kernel linux/RHEL5/vmlinuz
append initrd=linux/RHEL5/initrd.img netboot=nfs nfsroot=192.168.95.3:/media/RHEL5
LABEL CENTOS5
kernel linux/CENTOS5/vmlinuz
append initrd=linux/CENTOS5/initrd.img netboot=nfs nfsroot=192.168.95.3:/media/CENTOS5 ks=nfs:192.168.95.3:/nfsroot/CENTOS5.cfg
LABEL RESCUE
kernel linux/CENTOS5/vmlinuz
append rescue initrd=linux/CENTOS5/initrd.img netboot=nfs nfsroot=192.168.95.3:/media/CENTOS5 ks=nfs:192.168.95.3:/nfsroot/rescue.cfg
4a )
Add *.msg files are text,edit/create according to your needs
# pwd;ls -m
/tftpboot/msgdir
boot.msg, general.msg, options.msg, param.msg, rescue.msg
4b) CENTOS5.cfg,RHEL5.cfg created using system-config-kickstart utility.
cat rescue.cfg
# System keyboard
keyboard us
# System language
lang en_US
# Use NFS installation media
nfs --server=192.168.95.3 --dir=/media/CENTOS5
# Network information
network --bootproto=static --device=eth0 --gateway=192.168.95.2 --ip=192.168.95.5 --nameserver=10.41.10.105 --netmask=255.255.255.0 --onboot=on
6)Mount respective media and do NFS export.
EX:
mount -o loop /dev/cdrom /media/RHEL5/
cat /etc/exports
/media/RHEL5 *(insecure,rw,no_root_squash,async,no_subtree_check)
Run exportfs
7)start dhcpd,xinetd and tftp
service dhcpd start
service xinetd restart
/sbin/chkconfig tftp on
#/sbin/chkconfig --list tftp
tftp on
for DHCP,tftp errors check /var/log/messages file
8) PXE boot server and enjoy.
Directory listing of /tftpboot
#ls -R
.:
linux memdisk menu.c32 msgdir pxelinux.0 pxelinux.cfg
./linux:
CENTOS5 RHEL5
./linux/CENTOS5:
initrd.img README TRANS.TBL vmlinuz
./linux/RHEL5:
initrd.img README TRANS.TBL vmlinuz
./msgdir:
boot.msg general.msg options.msg param.msg rescue.msg
./pxelinux.cfg:
000C2909AAE8 C000025B default
Thursday, October 1, 2009
Wednesday, September 30, 2009
Secure and non secure item page
In our environment,
few pages were giving error "
"This page contains both secure and nonsecure items. Do you want to display the nonsecure items?"
after removing this tag <html:base /> the error went away.
few pages were giving error "
"This page contains both secure and nonsecure items. Do you want to display the nonsecure items?"
after removing this tag <html:base /> the error went away.
Tuesday, September 29, 2009
configuring devices
AIX
Like panacea, just one command cfgmgr.
Solaris:
Either of the following commands
1 and 2 for newbies :)
Like panacea, just one command cfgmgr.
Solaris:
Either of the following commands
1 and 2 for newbies :)
- In Open Boot PROM, use:
boot -r
- With your OS online, reboot your system with this flag:
reboot -- -r
(The system boots with the-r
flag as it does withboot -r
.) - Execute these commands:
drvconfig
,devlinks
,disks
cfgadm -la
prtdiag
network management
I'll try to explain how to create link aggregation a.ka. Ether channe(AIX), Net-bond(Linux).
Before we create one, we have to know, how many interfaces are present in that system.
List network interfaces.
AIX
# lsparent -C -k ent
ent0 Available 03-08 10/100/1000 Base-TX PCI-X Adapter (14106902)
ent1 Available 03-09 10/100/1000 Base-TX PCI-X Adapter (14106902)
Linux
systool -c net
Class = "net"
Class Device = "bond0"
Device = "0000:02:01.0"
Class Device = "eth1"
Device = "0000:02:05.0"
Class Device = "lo"
Class Device = "sit0"
ip link show
1: lo: mtu 16436 qdisc noqueue
link/loopback 00:00:00:00:00:00 brd 00:00:00:00:00:00
2: eth0: mtu 1500 qdisc pfifo_fast qlen 1000
link/ether 00:0c:29:81:c0:13 brd ff:ff:ff:ff:ff:ff
3: sit0: mtu 1480 qdisc noop
link/sit 0.0.0.0 brd 0.0.0.0
Solaris
# dladm show-dev
e1000g0 link: up speed: 1000 Mbps duplex: full
e1000g1 link: up speed: 1000 Mbps duplex: full
change NIC settings to full duplex/Autoneg
AIX
chdev -l 'ent0' -a media_speed='1000_Full_Duplex'
Linux
ethtool --change eth0 autoneg off speed 1000 duplex full
ethtool eth0 (same as entstat ent0 on AIX)
Solaris
http://www.sun.com/bigadmin/jsp/descFile.jsp?url=descAll/how_to_set_your_nic
http://sysunconfig.net/unixtips/set_nic_settings.txt
Etherchannel configuration
AIX
smitty etherchannel
very easy huh :)
Linux
# ls "$PWD/ifcfg-eth0"
/etc/sysconfig/network-scripts/ifcfg-eth0
# cat ifcfg-eth0
MASTER=bond0
DEVICE=eth0
SLAVE=yes
ONBOOT=yes
USERCTL=no
BOOTPROTO=none
#cat ifcfg-eth1
MASTER=bond0
DEVICE=eth1
SLAVE=yes
ONBOOT=yes
USERCTL=no
BOOTPROTO=none
add/append following lines to /etc/modprode.conf
Solaris
the last step changes the hostname on to aggr1 .
A reboot is required .
For setting jumboframes
edit MaxFrameSize /kernel/drv/e1000g.conf/hme.conf
edit AutoNegAdvertised for setting full duplex etc
# dladm show-aggr -s
key: 1 ipackets rbytes opackets obytes %ipkts %opkts
Total 3930 408207 2337 222124
e1000g0 3084 309475 1601 158419 78.5 68.5
e1000g1 846 98732 736 63705 21.5 31.5
Check below link for SOlaris dladm and ethtool comparison
http://hub.opensolaris.org/bin/view/Project+brussels/ethtool-dladm-comparison
Before we create one, we have to know, how many interfaces are present in that system.
List network interfaces.
AIX
# lsparent -C -k ent
ent0 Available 03-08 10/100/1000 Base-TX PCI-X Adapter (14106902)
ent1 Available 03-09 10/100/1000 Base-TX PCI-X Adapter (14106902)
Linux
systool -c net
Class = "net"
Class Device = "bond0"
Device = "0000:02:01.0"
Class Device = "eth1"
Device = "0000:02:05.0"
Class Device = "lo"
Class Device = "sit0"
ip link show
1: lo:
2: eth0:
link/ether 00:0c:29:81:c0:13 brd ff:ff:ff:ff:ff:ff
3: sit0:
link/sit 0.0.0.0 brd 0.0.0.0
Solaris
e1000g0 link: up speed: 1000 Mbps duplex: full
e1000g1 link: up speed: 1000 Mbps duplex: full
change NIC settings to full duplex/Autoneg
AIX
chdev -l 'ent0' -a media_speed='1000_Full_Duplex'
Linux
ethtool -s speed 1000 duplex full autoneg on
ethtool --change eth0 autoneg off speed 1000 duplex full
ethtool eth0 (same as entstat ent0 on AIX)
Solaris
http://www.sun.com/bigadmin/jsp/descFile.jsp?url=descAll/how_to_set_your_nic
http://sysunconfig.net/unixtips/set_nic_settings.txt
Etherchannel configuration
AIX
very easy huh :)
Linux
# ls "$PWD/ifcfg-eth0"
/etc/sysconfig/network-scripts/ifcfg-eth0
# cat ifcfg-eth0
MASTER=bond0
DEVICE=eth0
SLAVE=yes
ONBOOT=yes
USERCTL=no
BOOTPROTO=none
#cat ifcfg-eth1
MASTER=bond0
DEVICE=eth1
SLAVE=yes
ONBOOT=yes
USERCTL=no
BOOTPROTO=none
alias bond0 bonding
options bond0 mode=balance-alb miimon=100
modprobe bonding (for loading bond module)
service network restart
less /proc/net/bonding/bond0
Output
Ethernet Channel Bonding Driver: v3.2.4 (January 28, 2008)
Bonding Mode: load balancing (round-robin)
MII Status: up
MII Polling Interval (ms): 0
Up Delay (ms): 0
Down Delay (ms): 0
Slave Interface: eth0
MII Status: up
Link Failure Count: 0
Permanent HW addr: 00:0c:29:81:c0:13
Slave Interface: eth1
MII Status: up
Link Failure Count: 0
Permanent HW addr: 00:0c:29:81:c0:1d
Refer: http://www.linuxfoundation.org/en/Net:Bonding
Solaris
the last step changes the hostname on to aggr1 .
A reboot is required .
For setting jumboframes
edit MaxFrameSize /kernel/drv/e1000g.conf/hme.conf
edit AutoNegAdvertised for setting full duplex etc
# dladm show-aggr -s
key: 1 ipackets rbytes opackets obytes %ipkts %opkts
Total 3930 408207 2337 222124
e1000g0 3084 309475 1601 158419 78.5 68.5
e1000g1 846 98732 736 63705 21.5 31.5
Check below link for SOlaris dladm and ethtool comparison
http://hub.opensolaris.org/bin/view/Project+brussels/ethtool-dladm-comparison
Monday, September 28, 2009
db2 update
run following command after db2fix pack installation
# ./db2_08_01/instance/db2iupdt db2inst1
DBI1070I Program db2iupdt completed successfully.
# ./db2_08_01/instance/db2iupdt db2inst1
DBI1070I Program db2iupdt completed successfully.
Solaris VXVM prerequisites
pkgadd -d /mnt/Solaris_10/Product SUNWscpr SUNWscpu SUNWtoo
pkginfo -d /mnt/Solaris_10/Product SUNWtoo ( required for od)
Above packages are required for Veritas volume-manager installation.
# which od
/usr/bin/od
# pkgchk -l -p /usr/bin/od
Pathname: /usr/bin/od
Type: regular file
Expected mode: 0555
Expected owner: root
Expected group: bin
Expected file size (bytes): 19276
Expected sum(1) of contents: 34966
Expected last modification: Jan 22 21:13:49 2005
Referenced by the following packages:
SUNWtoo
Current status: installed
Wednesday, September 23, 2009
Solaris Disk management
List disks
printf "\0x1A" | format | grep DEFAULT
or
perl -e "print \"\\x1A\";" | format
0x1A is CTRL \D in ASCII
or
format < /dev/null
Size of a disk and partition/layout info
# prtvtoc /dev/dsk/c1t0d0s2
* /dev/dsk/c1t0d0s2 partition map
*
* Dimensions:
* 512 bytes/sector
* 32 sectors/track
* 128 tracks/cylinder
* 4096 sectors/cylinder
* 4094 cylinders
* 4092 accessible cylinders
*
* Flags:
* 1: unmountable
* 10: read-only
*
* First Sector Last
* Partition Tag Flags Sector Count Sector Mount Directory
0 2 00 1052672 9863168 10915839 /
1 3 01 4096 1048576 1052671
2 5 00 0 16760832 16760831
7 8 00 10915840 5844992 16760831 /export/home
8 1 01 0 4096 4095
# bc
4096*128*32*512 (cyclinders*tracks*sectors*512) -->for total number of bytes of disk space.
8589934592 BYTES
scale=4
8589934592/1024
8388608.0000 KB
8388608.0000/1024
8192.0000 MB
8192.0000/1024
8.0000 GB
scan for new luns /disks (devfsadm -c disk)
# printf "\0x1A" | format | grep DEFAULT
0. c1t0d0
# devfsadm -c disk
# printf "\0x1A" | format | grep DEFAULT
0. c1t0d0
1. c1t1d0
for SAN
Remove a disk drive (cfgadm)
# printf "\0x1A" | format | grep DEFAULT
0. c1t0d0
1. c1t1d0
# cfgadm -c unconfigure c1::dsk/c1t1d0
# printf "\0x1A" | format | grep DEFAULT
0. c1t0d0
http://www.utahsysadmin.com/2009/05/15/new-lun-solaris9-vxfs-powerpath/
printf "\0x1A" | format | grep DEFAULT
or
perl -e "print \"\\x1A\";" | format
0x1A is CTRL \D in ASCII
or
format < /dev/null
Size of a disk and partition/layout info
# prtvtoc /dev/dsk/c1t0d0s2
* /dev/dsk/c1t0d0s2 partition map
*
* Dimensions:
* 512 bytes/sector
* 32 sectors/track
* 128 tracks/cylinder
* 4096 sectors/cylinder
* 4094 cylinders
* 4092 accessible cylinders
*
* Flags:
* 1: unmountable
* 10: read-only
*
* First Sector Last
* Partition Tag Flags Sector Count Sector Mount Directory
0 2 00 1052672 9863168 10915839 /
1 3 01 4096 1048576 1052671
2 5 00 0 16760832 16760831
7 8 00 10915840 5844992 16760831 /export/home
8 1 01 0 4096 4095
# bc
4096*128*32*512 (cyclinders*tracks*sectors*512) -->for total number of bytes of disk space.
8589934592 BYTES
scale=4
8589934592/1024
8388608.0000 KB
8388608.0000/1024
8192.0000 MB
8192.0000/1024
8.0000 GB
scan for new luns /disks (devfsadm -c disk)
# printf "\0x1A" | format | grep DEFAULT
0. c1t0d0
# devfsadm -c disk
# printf "\0x1A" | format | grep DEFAULT
0. c1t0d0
1. c1t1d0
for SAN
devfsadm -C
cfgadm -al (to get a list of controllers)
cfgadm -c configure c2::500610003412EAB23141
cfgadm -c configure c4::500610003412EAB23142
vxdctl enable (to tell veritas to look for new disks)
THEN
vea (to work with them)
Remove a disk drive (cfgadm)
# printf "\0x1A" | format | grep DEFAULT
0. c1t0d0
1. c1t1d0
# cfgadm -c unconfigure c1::dsk/c1t1d0
# printf "\0x1A" | format | grep DEFAULT
0. c1t0d0
http://www.utahsysadmin.com/2009/05/15/new-lun-solaris9-vxfs-powerpath/
update time using ntpdate
On Linux
# ntpdate -u 10.0.250.10
23 Sep 09:10:21 ntpdate[21154]: step time server 10.0.250.10 offset -68.557099 sec
on AIX
# /usr/sbin/ntpdate 10.0.250.10
23 Sep 09:10:59 ntpdate[442560]: step time server 10.0.250.10 offset 7.100248
# ntpdate -u 10.0.250.10
23 Sep 09:10:21 ntpdate[21154]: step time server 10.0.250.10 offset -68.557099 sec
on AIX
# /usr/sbin/ntpdate 10.0.250.10
23 Sep 09:10:59 ntpdate[442560]: step time server 10.0.250.10 offset 7.100248
filter selective IPs in http access_log
F5 (BIG IP) was filling up http acess logs while doing health check , I have decided not to write this IP in access_log.
avoided images reuest messages as-well.
included following settings in httpd.conf
SetEnvIf Remote_Addr "10\.41\.15\.249" nolog
SetEnvIf Request_URI .gif$ images nolog
#CustomLog logs/access_log common
CustomLog logs/images_log common env=images
CustomLog logs/access_log common env=!nolog
avoided images reuest messages as-well.
included following settings in httpd.conf
SetEnvIf Remote_Addr "10\.41\.15\.249" nolog
SetEnvIf Request_URI .gif$ images nolog
#CustomLog logs/access_log common
CustomLog logs/images_log common env=images
CustomLog logs/access_log common env=!nolog
Wednesday, September 9, 2009
Day to Day
Find and replace
find ./ -name "*.xml" | xargs perl -pi -w -e 's/ port="3268"/ port="389"/g;'
find size of files and sort them in order.
find ./ -name "*.xml" | xargs perl -pi -w -e 's/ port="3268"/ port="389"/g;'
find size of files and sort them in order.
OSR5:
#!/bin/ksh
find $1 -type f -size +2048 -xdev -exec ls -s {} | /bin/sort -brut " "
#!/bin/ksh
find $1 -type f -size +2048 -xdev -exec ls -s {} | /bin/sort -brut " "
UW7:
#!/bin/ksh
find $1 -type f -size +2048 -xdev -exec ls -s {} + | /bin/sort -nr
Not sure where I found these one liners.Thanks to the author.
gzip and untar a file in to separate directory , by keeping source as it is.
gzip -dc /tmp/SxRT-5.0MP3-2008-09-11a.dvd4_sfb-sol_x64.tar.gz | tar -xvf -
if you don't want to keep source as it is
just use
tar zxvf /tmp/SxRT-5.0MP3-2008-09-11a.dvd4_sfb-sol_x64.tar.gz
Tuesday, September 8, 2009
Creating a service in AIX
Wanted to control dmgr with startsrc and stopsrc commands
First create a subsystem using mkssys
#!/bin/ksh
#-R \
mkssys -s dmgr -G was61 -p "/usr/IBM/WebSphere/AppServer/profiles/Dmgr01/bin/dmgrService.sh" -u $(id -u) -S -n 15 -f 9 -Q
#!/bin/ksh
trap "" HUP INT QUIT TSTP STOP
trap "stopService" TERM
stopService ()
{
#cleanup stuff
echo " Cleaning now `date` " >>/tmp/test1.log
#/usr/IBM/WebSphere/AppServer/profiles/Dmgr01/bin/stopManager.sh -username <>
ath.Varanasi -password <>
exit 0
}
#launchScript=/usr/IBM/WebSphere/AppServer/profiles/Dmgr01/bin
numRetries=3
#binDir=`dirname $0`
# Set the ulimit
LIMIT=`ulimit -n`
if [ "${LIMIT}" != "unlimited" ]
then
if [ $LIMIT -lt 1024 ]
then
ulimit -n 1024
fi
fi
RETRY=0
while [ $RETRY -lt $numRetries ]
do
echo launching server using start_dmgr.sh >>/tmp/test1.log
#/usr/IBM/WebSphere/AppServer/profiles/Dmgr01/bin/start_dmgr.sh
echo pid of dmgr is $$ >>/tmp/test1.log
#/bin/ksh exec sleep 3600
/usr/IBM/WebSphere/AppServer/profiles/Dmgr01/bin/sleep.sh
while true
do
ps -aef | grep sleep | grep -v grep
if [ $? -eq 0 ]
then
sleep 1
fi
done
# $binDir/$launchScript
rc=$?
echo exit code: $rc
# Increment retry count on anything other than a normal exit code
if [ $rc -gt 0 ]
then
RETRY=`expr $RETRY + 1`
fi
case $rc in
0) break ;;
esac
done
exit 0
Tomcat Automation
I am maintaining multiple tomcat servers and started automating environment as much as I can, like following.
1)Deploying applications to all servers
2)starting all tomcat servers
3) stoping all tomcat servers
4) checking the status of all tomcat servers.
As you know, Deploying war files across multiple servers consistently, is as much as difficult as
maintaining an unruly class room. Tomcat doesn't provide any means of distributed mechanism like websphere and weblogic application servers. So I am forced to use all unix commands.
One way to deploy application to all servers is, to deploy the application on one server and push same to all servers using rsync.
#!/bin/ksh
###
##
# rsync between host1 and host2 for only
##
###
echo "-------------------`date`----------------" >>/tmp/rsync.log
rsync -gloprtuv -e ssh --stats /usr/tomcat/webapps/ host2:/usr/tomcat/webapps 2>&1 >>/tmp/rsync.log
don't forget to enable password less logins between host1 and host2 by exchanging authorized keys.
2)starting/stoping all tomcat servers
to start and stop either you could do regular scripting "for host in host1,host2....do stopserver.sh
done" or dsh
dsh makes your script simple and easy.
export DSH_NODE_RSH=/usr/bin/ssh
export DSH_NODE_LIST=/usr/tomcatadm/nodes
dsh /usr/tomcat/bin/startup.sh
dsh /usr/tomcat/bin/shutdown.sh
1)Deploying applications to all servers
2)starting all tomcat servers
3) stoping all tomcat servers
4) checking the status of all tomcat servers.
As you know, Deploying war files across multiple servers consistently, is as much as difficult as
maintaining an unruly class room. Tomcat doesn't provide any means of distributed mechanism like websphere and weblogic application servers. So I am forced to use all unix commands.
One way to deploy application to all servers is, to deploy the application on one server and push same to all servers using rsync.
#!/bin/ksh
###
##
# rsync between host1 and host2 for
##
###
echo "-------------------`date`----------------" >>/tmp/rsync.log
rsync -gloprtuv -e ssh --stats /usr/tomcat/webapps/
don't forget to enable password less logins between host1 and host2 by exchanging authorized keys.
2)starting/stoping all tomcat servers
to start and stop either you could do regular scripting "for host in host1,host2....do stopserver.sh
done" or dsh
dsh makes your script simple and easy.
export DSH_NODE_RSH=/usr/bin/ssh
export DSH_NODE_LIST=/usr/tomcatadm/nodes
dsh /usr/tomcat/bin/startup.sh
dsh /usr/tomcat/bin/shutdown.sh
Funny blog name
Well, I wanted to give some meaningful name to my blog related to UNIX.
Most of the names were already taken, So I coined the word halsinx.(not NIX)
H(HP-UX)A(AIX)L(Linux)S(Solaris)nix.
Here I'll be blogging my daily findings, work, cracks etc.
Most of the names were already taken, So I coined the word halsinx.(not NIX)
H(HP-UX)A(AIX)L(Linux)S(Solaris)nix.
Here I'll be blogging my daily findings, work, cracks etc.
Subscribe to:
Posts (Atom)